Turn your old or broken Android phone into a home security camera

What to do with that old Android phone sitting in your drawer? You know, the three-year-old Moto G with the broken screen. That one. Here’s an easy plan: turn it into a home security camera on the cheap.

  1. [optional] Make sure you have anything of value copied off to a safe place, and clear off all personal data by resetting the device to factory settings. You probably should have done this before putting it into the drawer in the first place. Restart the device, get it set up, connect it to your wi-fi, and add a Google account so you can download stuff from the Play Store. If this is a real Google account that you use for email and such you might want to turn off all syncing.
  2. Install the IP Webcam app. There are other apps out there as well, and this has a Pro upgrade version for a few bucks which looks to have some nice features.
  3. Run the app and mount the camera in a place where:
    • it shows what you want
    • can be reached by a charging cable connected to a power outlet
    • isn’t going to be attacked by weather, kids, pets, etc.
  4. Note the IP address of the phone (the app will show you this), and play with the settings a bit. I turned on motion detection and video recording on motion. Consider enabling security features if that makes sense for your network.
  5. Access the video stream on the same wi-fi network. You can view it in a browser at http://phone-ip-address:8080. I’m using the VLC app on an old Android tablet to view the stream from my family room, connected to the stream at http://phone-ip-address:8080/video.

I mounted my camera in a window in a detached garage that has a good-enough wi-fi signal an a good view of the driveway. With blue painters tape and some cardboard. It’s not pretty, but it works!
 

Cheap homemade pickup for your acoustic instrument

I have several acoustic stringed instruments. I’m not very good at playing any of them, but I have a lot of fun trying. Mandolin, ukulele, banjo, and a handful of guitars.

When playing with a drummer or trying to get a recording, it’s nice to be able to plug in an instrument and get some extra volume. Plus, with an electrified instrument you can always add pedals, post-processing, and other effects to alter the sound a bit.

I’ve done a permanent install of an under-saddle pickup on a guitar before, but I didn’t want to spend the time or money on each instrument to get all the instruments upgraded.

I’d heard about homemade piezo-transducer pickups before, so I thought I’d see if I could make one my own. Sure, you can buy cheap ones, but where’s the fun in that?

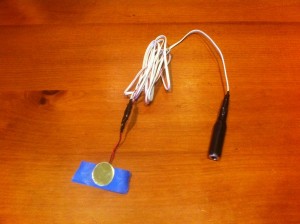
So, I made one myself. Total cost was under $6. Here’s the finished product, in all it’s DIY glory:

The finished product

Parts list
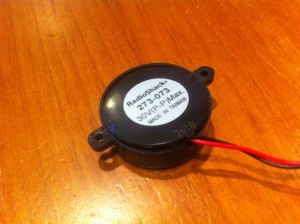
1. Piezo transducer. Radio Shack part number 273-0073.
2. 1/4″ mono jack. Radio Shack part number 274-0340.
3. A length of 2-conductor wire. I used some leftover 18-gauge wire from a garage door opener.
4. Some electrical tape.
5. Some blue painters tape.

Tools aren’t required, but a wire stripper and a solder gun are useful.

Assembly instructions
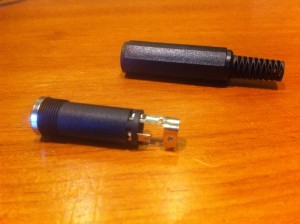
1. Remove the transducer from the plastic housing. I used a small slotted screwdriver to pry the top off. Be careful, or plan on another trip to Radio Shack and another $3.

2. Strip insulation from both conductors on each end of the wire.
3. Connect the two leads from the transducer to the two conductors on one end of the wire. Insulate bare wires with electrical tape.
3. Disassemble the jack.

4. Slide the jack housing over the other end of the wire.
5. Connect the conductors on that end of the wire to the two connection points on the jack internals. Solder or tape the conductors in place.
6. Screw the jack housing onto the jack internals.

Connecting the pickup to the instrument
I used blue painters tape to affix the transducer to the top of my mandolin, just below the bridge. Test out several locations on the top and back of the instrument for best sound.

On my ukulele, the best-sounding location was on the back:

When finished, plug in, grab a beer, and bask in your electrified awesomeness.

If you’re bored, listen to my first electric mandolin recording experiment: Ashokan Farewell, recorded as two A/B inverted parts using my standard recording tools.

The most expensive Kindle case ever

Kindle 3Back in 2003 I was coming off a failed startup and worked a couple of contract software development gigs while looking for a steady job.

Oh, and I was building a new house at the time too. I was the general contractor as well as the guy with the hammer in hand. Busy busy.

The first permanent-position offer I got was at Amazon.com, as a senior-level software developer. Can’t recall the exact details of the offer, but it was a pretty good opportunity. I got a new-hire benefits packet in a brown folder along with the offer.

Unfortunately, I lived in Portland, and the job was in Seattle. Building a new house and immediately moving to Seattle seemed a bit rash. I declined the offer, which included AMZN stock in the deal. AMZN has increased over 300% since then.

The job I took instead didn’t require relocation, and didn’t have stock.

I stuffed the benefits folder in a file cabinet and forgot about it.

Fast forward to today, and I have a shiny new Kindle 3 (which is a fantastic device, BTW). Knowing that I’ll be carrying this e-book reader around quite a bit, throwing it in bags & such, I started to get a bit worred about the screen getting damaged.

I’m a DIY kind of guy, so I thought I’d just make a case myself instead of buying one of the lovely manufactured case options out there.

I had just recently emptied out that file cabinet and recyled the folder, and in a moment of serendipity I came up with the idea of using the Amazon.com folder as DIY case material.

Unearthing the folder from the recyle bin took longer than turning it into a case. Three minutes, some scissors, and bunch of packing tape later … behold the most expensive Kindle case ever.

The most expensive Kindle case ever

Materials cost: $0.01
Opportunity cost: $lots

I’d provide instructions, but I think you can figure it out yourself.