My first all-electric car

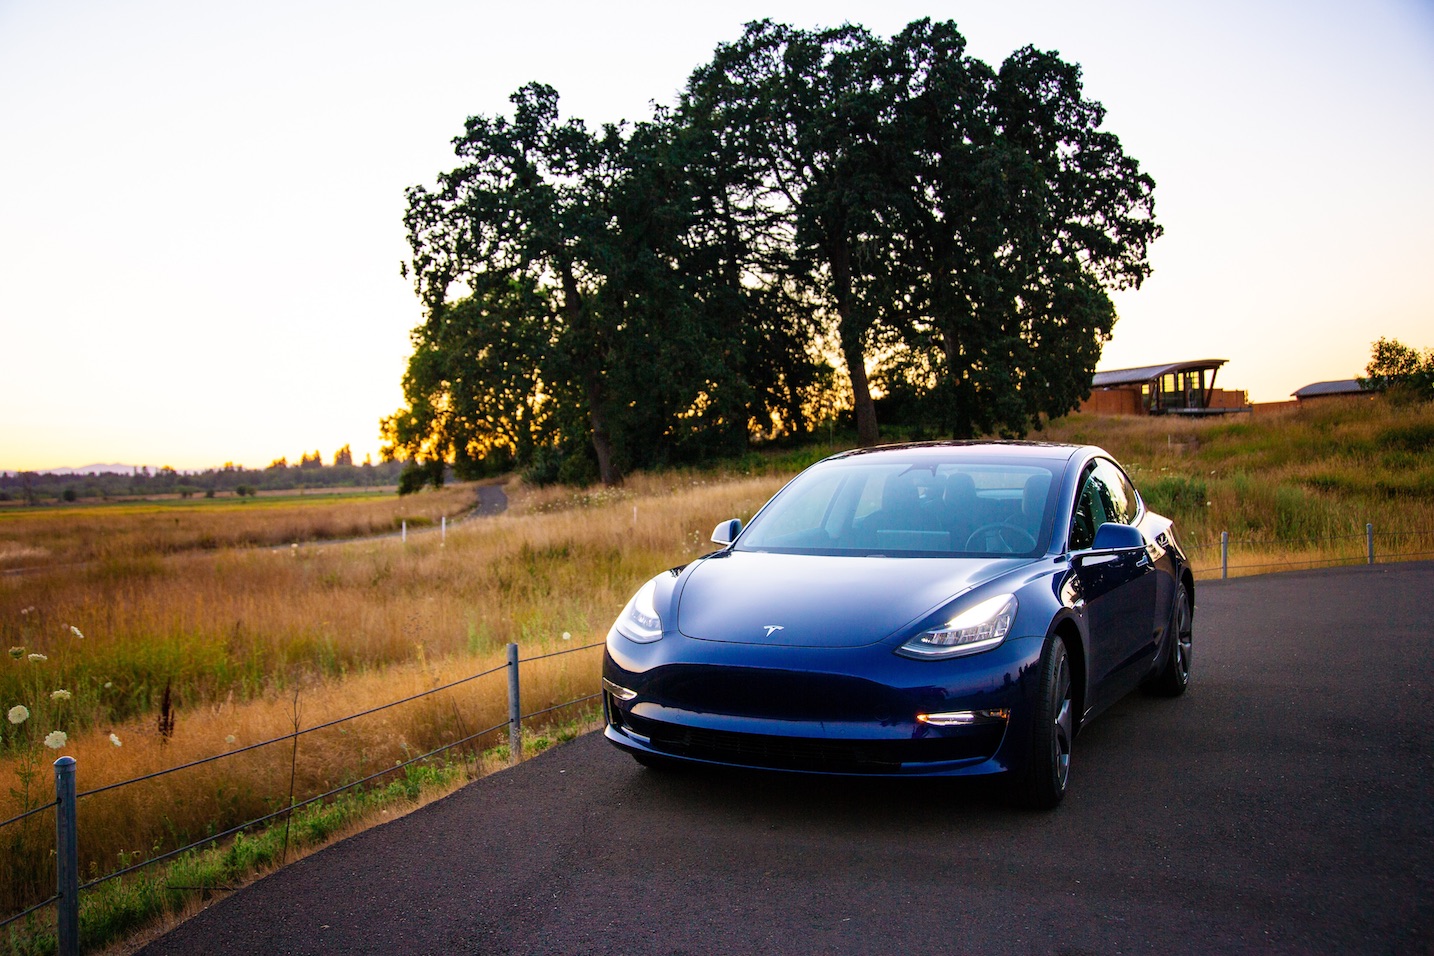
Angie and I purchased a 2018 Tesla Model 3 last week. This car represents a number of firsts for us:

  • our first electric car
  • our first new car since 2002
  • our first car from an American manufacturer

And it’s certainly the nicest and fastest car we’ve ever had. It’s really cool!

I’m not a huge car guy, although I do love my two old Toyota Land Cruisers and I take some pride in acquiring and maintaining interesting old cars for my kids (old Mercedes 300Ds and a VW camper van). I’d really prefer to not have any cars at all, but instead use feet, pedals, and shared transport to get around. But in our current life stage, and where we live and where I work, having a car is useful.

At this point, only the long-range battery pack (~310 mile range) is available, which adds $9K to the “base” price. That’s a lot. Do I need it? No. I’m not unhappy that I got it though, so good on Tesla I guess.

In 2002, our kids were little and we bought a new Honda Odyssey. Nice van. Hated it of course. It was a minivan! But that was a good inflection point for us — we decided that we weren’t going to buy a new car again until we could get one that was all electric.

We waited 16 years for the right car to happen. Truth. I remember quite clearly on March 31st 2016 when Tesla was showing off the Model 3 prototypes, and opened up reservations for deliveries that wouldn’t happen for 18 months. I was sitting on the couch watching a replay of the reveal, and plunked down the $1000 to get in the queue. Certainly an impulsive decision, but it felt like our opportunity to get a decent electric car.

There are some good alternatives out there now. For a lot less money, the Bolt is uninspiring and has the fugly GM design choices, but is by all accounts a really good car. The new Leaf looks less like a deformed insect than the prior model, and also seems like a good choice. On the higher end, the Jaguar I-Pace will probably kick ass, but I’m not sold that it’s a better bet than the Model X. Tesla’s supercharging network is still a competitive advantage.

If you’ve followed the interwebs and feel concerned about the Model 3’s quality (fit and finish, manufacturing concerns) or the minimalist and software-driven interior experience, well, all of that is crap. Quality is high, the design is beautiful, and the minimalism and touchscreen approach are the future of cars. Well, at least the future of cars for humans to operate. The premium interior isn’t anything like, say, a new Volvo, but it’s still very nice. The driving experience is awesome. This thing is fast, quick, corners well, and stops well.

I don’t have autopilot configured. Can’t comment on that. It was a big enough step for me to move to a car with integrated bluetooth, antilock brakes, and a rearview camera. (Yes, my other cars are that old). I’m good with still being in charge of the vehicle’s operation.

The relative simplicity of an all-electric car really appeals to me. Absent are so many fluids, bearings, belts, hoses, sensors, fittings, etc. Fewer things to go wrong. Not being dependent on dino fuel is nice as well.

Turn your old or broken Android phone into a home security camera

What to do with that old Android phone sitting in your drawer? You know, the three-year-old Moto G with the broken screen. That one. Here’s an easy plan: turn it into a home security camera on the cheap.

  1. [optional] Make sure you have anything of value copied off to a safe place, and clear off all personal data by resetting the device to factory settings. You probably should have done this before putting it into the drawer in the first place. Restart the device, get it set up, connect it to your wi-fi, and add a Google account so you can download stuff from the Play Store. If this is a real Google account that you use for email and such you might want to turn off all syncing.
  2. Install the IP Webcam app. There are other apps out there as well, and this has a Pro upgrade version for a few bucks which looks to have some nice features.
  3. Run the app and mount the camera in a place where:
    • it shows what you want
    • can be reached by a charging cable connected to a power outlet
    • isn’t going to be attacked by weather, kids, pets, etc.
  4. Note the IP address of the phone (the app will show you this), and play with the settings a bit. I turned on motion detection and video recording on motion. Consider enabling security features if that makes sense for your network.
  5. Access the video stream on the same wi-fi network. You can view it in a browser at http://phone-ip-address:8080. I’m using the VLC app on an old Android tablet to view the stream from my family room, connected to the stream at http://phone-ip-address:8080/video.

I mounted my camera in a window in a detached garage that has a good-enough wi-fi signal an a good view of the driveway. With blue painters tape and some cardboard. It’s not pretty, but it works!


ASP.NET vNext : on a Mac!

I use a MacBook Pro (currently running OS X, 10.9)  as my primary work machine, even though my company builds software for Windows Server. This means VMs (VirtualBox) and Remote Desktop for all Visual Studio work (as well as Visio and other necessary evils). BootCamp isn’t an option, for various company-specific reasons.

I read Scott Hanselman’s ASP.NET vNext announcement a few months ago, and while Mac support isn’t the main thrust of the project, the prospect of shifting even more of my daily work to the native Mac interface is appealing.

I never took the time to play with the vNext tooling for Macs until today. I like where this is headed, even though it’s at the duct-tape stage.

Getting set up is a pretty straightforward exercise, using the instructions here. Which boil down to:

  1. Install mono.
  2. Install homebrew.
  3. Install the K version manager. (Project K being the old code name for the ball of wax).
  4. Grab the samples, pull in package dependencies (via kpm restore), and run ’em. If done right, you get a shiny hello world:

It's alive!

Next on the to-do list:

  1. Write some custom code, following the samples.
  2. Sublime Text 3 integration. With detail here.

Find all NuGet references in your source tree

I have a source code repository with a bunch of Visual Studio 2012 projects. I just had a need to find all NuGet references in that repo. PowerShell to the rescue! This script walks the directory tree and spits out an array of strings containing the names of all NuGet package names, with duplicates removed.

# Given the directory tree at the current location,
# search recursively for all files named "packages.config"
# and select the ID of each package. Assumes that packages.config
# is an XML document with a top-level <packages> element with a nested
# collection of <package> elements underneath.

$result = @()
ls -r packages.config | foreach {
  [xml] $data = get-content $_.fullname
  $data.packages.package | foreach {
    # Brute-force shove into an array, we'll sort it out later.
    $result += $_.id
  }
}
# It's later! Sort, and unique-ify.
$result | sort -unique

SSD upgrade for 2011 iMac

I picked up a Crucial m4 256GB SSD as a second internal drive for my 2011 iMac 27″ with 12GB of RAM, the factory 1TB hard drive, and OSX 10.8.3. The SSD is now my boot drive, with all my applications and user folders on it as well. Performance is excellent — apps (Pages, Word, Excel, Photoshop, iPhoto, iMovie, etc.) all start immediately, and I can run whatever apps I want simultaneously. It just works.

Before installation, I made sure I had a Time Machine backup (on a Synology NAS) and a backup on CrashPlan’s servers. I used the SATA cable and installation tools from OWC, and followed OWC’s awesome installation video, below. The SSD mounts inside the machine using foam sticky tape just behind the DVD drive.

After installing this drive, I used SuperDuper to replicate the stock “Macintosh HD” volume to the SSD, then used System Preferences –> Startup Disk to change my startup disk to the SSD. I also picked up the app TRIM Enabler, and turned on TRIM support. Upon rebooting, I also unmounted the Macintosh HD volume using Disk Utility, just to make sure I wasn’t accidentally using files on that volume. After a few days of using the new SSD and verifying I have no problems, I will erase the original Macintosh HD volume and use it for whatever.

256GB is plenty for the OS, my apps, and docs. But it is not sufficient to include my photos, music, and movies. All that stuff is on external drives anyway, so I didn’t have to worry about that.

This is also posted as an Amazon review.

Time Machine sucks, use rsync instead

Mac OSX has a great built-in feature called Time Machine, which is designed to provide simple backup & restore functionality for your system. Time Machine does more than just keep a most-recent backup handy; it keeps track of changes to your files on a regular basis, and allows you to go back in time to a prior state of your filesystem to recover files that were lost — even those that were deleted intentionally.

Time Machine can write backups to an external drive (USB, FireWire, or Thunderbolt), or to a network device. Apple sells a network device called Time Capsule that works with Time Machine, but other vendors also provide NAS devices that integrate directly with the Time Machine software on the Mac client.

I’ve been Mac-only at home for six years, and have used Time Machine ever since it first appeared in Leopard, in 2007. Last year, I upgraded my backup strategy to point all machines to a Synology DS411j NAS. This has been an awesome little device, and I use it for more than just backup/restore.

Backups are pretty darn important

Your data is really important to you. Trust me. Maybe it’s your family photos or home movies. Or tax returns. Or homework. Whatever it is, it’s critical you keep at least two copies of it, in the event of accidental deletion, disk failure, theft, fire, or the zombie apocalypse.

Scott Hanselman has a nice writeup on implementing a workable backup and recovery strategy. I’ve done that, and you should do the same. If you use a Mac, Time Machine should be part of your strategy, and it’s a heck of a lot better than no backup strategy at all. But be very wary of Time Machine, because it ain’t all roses.

Time Machine, In Which There Are Dragons

Time Machine is quite clever, and uses UNIX hard links to efficiently manage disk space on the backup volume. Backups are stored in a sparse bundle file, which is a form of magic disk image that houses all backup data.

But, I swear, it is sometimes just too magic for its own good. It is decidedly not simple under the hood, and when it fails, it fails in epic fashion. See this for some examples.

I’ve had at least five backup failures that I blame on Time Machine in the past four years. In OSX Lion, one kind of failure shows up like this:
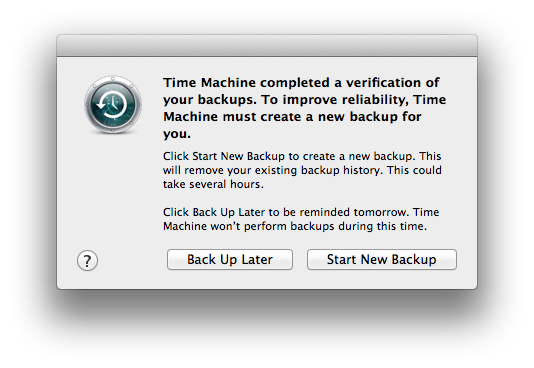
There is no recovery option provided to you. If you say “Start new backup”, it deletes your old one and begins anew. If that’s terabytes of photos/video/music/whatever, be prepared for a very long wait. Perhaps days, depending on your backup data set size, network speed, disk speed, and phase of the moon. Okay, maybe not the last part, but you never know.

And in the meantime, your backup system is gone. At this point, it is obvious that having data in at least three places is necessary. (Note that there are techniques for repairing the Time Machine backup volume. Dig out the solder and oscilloscope first, though).

You didn’t do anything, but Time Machine broke. That is completely unacceptable for a backup system.

It’s quite possible that I’m doing it all wrong. And the problems may not be Apple software errors; they may be a function of Apple+Synology, or just Synology. But that is beside the point. Any backup strategy that can fail and irrecoverably take all your data to Valhalla is a horrible strategy. I need something that cannot fail.

A better strategy, with 73% less insanity

As it turns out, I have never really cared about the save-old-versions-of-files feature of Time Machine. I have used it to recover entire volumes — twice, both during machine upgrades. Recovering an inadvertently deleted file is rather rare for me, but I suppose I do care about that feature a little bit.

Time Machine sparsebundle files are opaque to the average user. You cannot open them up, peek inside, and grab the files you need. You need the Time Machine client, and when it encounters an error with the backup file, it offers no choice but to abort and start over.

This is why I use rsync. With a little bit of Time Machine still involved for added spice. You know, just to keep things interesting.

Plus, rsync sounds cooler.

Rsync is a command-line tool, available for several platforms, and included with Mac OSX. In its simplest form, it just copies files from one place to another. But it can also remove files no longer needed, exclude things you don’t care about, and work across a network, targeting a mounted volume or a remote server that supports SSH. Which is how I use it.

The end result of an rsync backup is a mirror of your source data. Readable by anything that can read the format of the target filesystem. This part is critical. Backups are irrelevant if nothing can recover them. A bunch of files in a directory on a disk is accessible by just about everything. Time Machine sparsebundles require Time Machine, on a Mac. Files in a directory can be read by any app or OS. Thisincreases your odds of recovery by, well, a lot.

I have a few computers around the house. Our primary family computer is an iMac, and has one internal disk and two USB external disks. The internal disk has all the user folders, documents, applications, and OS files. The external drives contain photos, movies, music, etc.

My backup strategy has the internal disk backed up to my NAS using Time Machine, and the the external disks backed up to the same NAS using rsync.
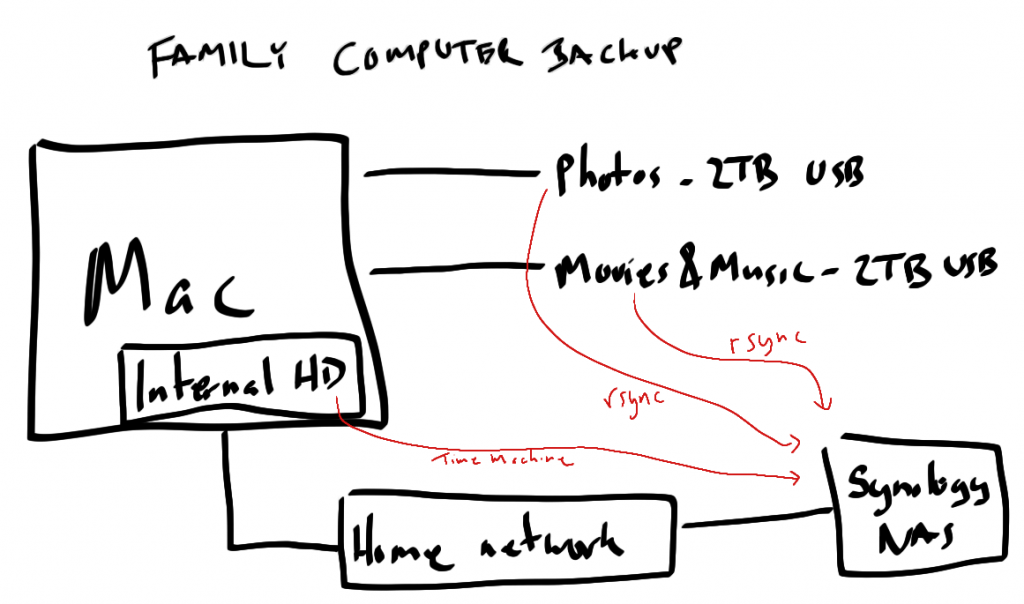
Some notes:

  • The Internal HD volume is less than 100GB, and the backup executes automatically every hour.
  • I wrote simple shell scripts to automate the rsync commands. I execute the rsync scripts manually, but these are easy to automate.

I won’t go into too much detail on rsync usage (some resources that might help: 1, 2, 3), but here’s how I backup an entire external volume using rsync:

rsync -av --delete --exclude ".DS_Store" --exclude ".fseventsd" --exclude ".Spotlight-V100" --exclude ".TemporaryItems" --exclude ".Trashes" /Volumes/your-local-volume-name-that-you-want-backed-up/ user-name@backup-server:/volume-name-on-server/path-on-backup-server


The -av says “archive, with verbose output”. The –delete option says “get rid of anything on the server that’s no longer on my local machine” (be careful with this one). The –exclude options allow me to avoid backing up crap I don’t need. The username stuff allows me to log in to the server and perform the backup using that identity on the server.

Summary

Rsync can fail with network or disk hardware errors. Time Machine can fail with network, disk hardware, or buggy software errors. I prefer rsync for the really important stuff, and use Time Machine for the OS disk, which is relatively small and something I can recover from quickly after the inevitable Time Machine error.
iPhone camera roll bug makes photos unavailable, hack your way to a fix

TL;DR … scroll down for a solution.

What happened?

My iPhone 4 with iOS5 started failing in a peculiar way a couple of weeks ago. I could take still photos and video without any trouble, but the camera roll display (in the Photos app) would fail to show thumbnails correctly, and attempts to pull the images onto my iMac wouldn’t work. Both iPhoto ’11 and the Image Capture app on Mac OS 10.7 could see my iPhone, but said that there were 0 photos on the device.

Really, I just wanted to get my photos & video off the device. And I couldn’t. I tried lame workarounds like emailing photos to myself (worked for photos, but not large videos) and syncing to Dropbox (failed, Drobox app couldn’t read photo library … which is itself a clue).

I needed a real fix. While I don’t know what caused this problem in the first place, I have one idea. Read to the end to find out.

Symptoms

Here’s what the thumbnail view looks like:

As you can see, several blank images, and several thumbnails are duplicates. Funny thing is, you could select items and see the correct image.

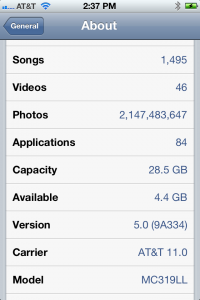
In the Settings app, under General | About, the number of reported photos is off the charts. Geeks will recognize this as a rather special number.

Finally, iTunes shows some space used by “Other”. This is close to the amount of space used by my photos & videos.

Solution

After Googling a bit with no clear solution in sight, I turned to Twitter. @jkubbeaver had the same problem, and stumbled upon a solution that worked for him, documented here. In case that link vaporizes, here’s a summary:

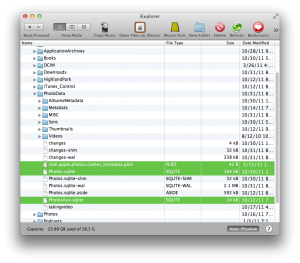
  • Download and install iExplorer, which allows you to manage the filesystem of your iPhone.
  • Fire up iExplorer with your iPhone connected via USB cable, and, as a precaution, copy photos/videos from the iPhone’s DCIM folder to your computer. At this point, you now have the files you want, but you still need to fix the underlying problem.
  • Navigate to the iPhone’s PhotoData folder, copy the com.apple.photos.caches_metadata.plist, Photos.sqlite, and PhotosAux.sqlite files to your computer (again, as a precaution), then delete them from the iPhone’s PhotoData folder. This deletes the iPhoto camera roll database and thumbnails, but does not delete the photos themselves.
  • Reboot your iPhone, navigate to the Photos app, and let it rebuild the camera roll database automatically.

At this point, all should be back to normal. This solution worked for me.

Addendum: why did this happen in the first place?

I’m not sure yet. When I upgraded to iOS5, I did not initially enable Apple’s PhotoStream service. After a few days, I enabled PhotoStream to give it a try … and then started seeing the symptoms. Is PhotoStream to blame? Unsure, but it’s the only thing that I can remember changing between “no problem” and “problem”. YMMV.

The most expensive Kindle case ever

Kindle 3Back in 2003 I was coming off a failed startup and worked a couple of contract software development gigs while looking for a steady job.

Oh, and I was building a new house at the time too. I was the general contractor as well as the guy with the hammer in hand. Busy busy.

The first permanent-position offer I got was at Amazon.com, as a senior-level software developer. Can’t recall the exact details of the offer, but it was a pretty good opportunity. I got a new-hire benefits packet in a brown folder along with the offer.

Unfortunately, I lived in Portland, and the job was in Seattle. Building a new house and immediately moving to Seattle seemed a bit rash. I declined the offer, which included AMZN stock in the deal. AMZN has increased over 300% since then.

The job I took instead didn’t require relocation, and didn’t have stock.

I stuffed the benefits folder in a file cabinet and forgot about it.

Fast forward to today, and I have a shiny new Kindle 3 (which is a fantastic device, BTW). Knowing that I’ll be carrying this e-book reader around quite a bit, throwing it in bags & such, I started to get a bit worred about the screen getting damaged.

I’m a DIY kind of guy, so I thought I’d just make a case myself instead of buying one of the lovely manufactured case options out there.

I had just recently emptied out that file cabinet and recyled the folder, and in a moment of serendipity I came up with the idea of using the Amazon.com folder as DIY case material.

Unearthing the folder from the recyle bin took longer than turning it into a case. Three minutes, some scissors, and bunch of packing tape later … behold the most expensive Kindle case ever.

The most expensive Kindle case ever

Materials cost: $0.01
Opportunity cost: $lots

I’d provide instructions, but I think you can figure it out yourself.