Mac OSX has a great built-in feature called Time Machine, which is designed to provide simple backup & restore functionality for your system. Time Machine does more than just keep a most-recent backup handy; it keeps track of changes to your files on a regular basis, and allows you to go back in time to a prior state of your filesystem to recover files that were lost — even those that were deleted intentionally.
Time Machine can write backups to an external drive (USB, FireWire, or Thunderbolt), or to a network device. Apple sells a network device called Time Capsule that works with Time Machine, but other vendors also provide NAS devices that integrate directly with the Time Machine software on the Mac client.
I’ve been Mac-only at home for six years, and have used Time Machine ever since it first appeared in Leopard, in 2007. Last year, I upgraded my backup strategy to point all machines to a Synology DS411j NAS. This has been an awesome little device, and I use it for more than just backup/restore.
Backups are pretty darn important
Your data is really important to you. Trust me. Maybe it’s your family photos or home movies. Or tax returns. Or homework. Whatever it is, it’s critical you keep at least two copies of it, in the event of accidental deletion, disk failure, theft, fire, or the zombie apocalypse.
Scott Hanselman has a nice writeup on implementing a workable backup and recovery strategy. I’ve done that, and you should do the same. If you use a Mac, Time Machine should be part of your strategy, and it’s a heck of a lot better than no backup strategy at all. But be very wary of Time Machine, because it ain’t all roses.
Time Machine, In Which There Are Dragons
Time Machine is quite clever, and uses UNIX hard links to efficiently manage disk space on the backup volume. Backups are stored in a sparse bundle file, which is a form of magic disk image that houses all backup data.
But, I swear, it is sometimes just too magic for its own good. It is decidedly not simple under the hood, and when it fails, it fails in epic fashion. See this for some examples.
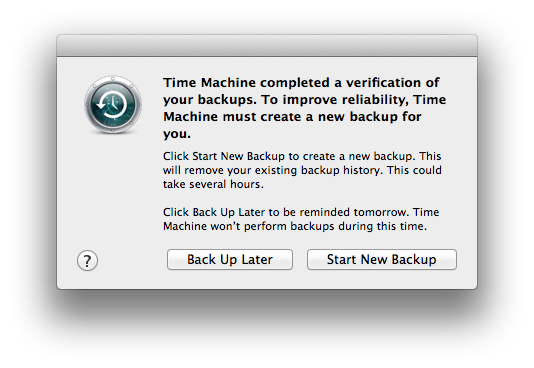
I’ve had at least five backup failures that I blame on Time Machine in the past four years. In OSX Lion, one kind of failure shows up like this:

There is no recovery option provided to you. If you say “Start new backup”, it deletes your old one and begins anew. If that’s terabytes of photos/video/music/whatever, be prepared for a very long wait. Perhaps days, depending on your backup data set size, network speed, disk speed, and phase of the moon. Okay, maybe not the last part, but you never know.
And in the meantime, your backup system is gone. At this point, it is obvious that having data in at least three places is necessary. (Note that there are techniques for repairing the Time Machine backup volume. Dig out the solder and oscilloscope first, though).
You didn’t do anything, but Time Machine broke. That is completely unacceptable for a backup system.
It’s quite possible that I’m doing it all wrong. And the problems may not be Apple software errors; they may be a function of Apple+Synology, or just Synology. But that is beside the point. Any backup strategy that can fail and irrecoverably take all your data to Valhalla is a horrible strategy. I need something that cannot fail.
A better strategy, with 73% less insanity
As it turns out, I have never really cared about the save-old-versions-of-files feature of Time Machine. I have used it to recover entire volumes — twice, both during machine upgrades. Recovering an inadvertently deleted file is rather rare for me, but I suppose I do care about that feature a little bit.
Time Machine sparsebundle files are opaque to the average user. You cannot open them up, peek inside, and grab the files you need. You need the Time Machine client, and when it encounters an error with the backup file, it offers no choice but to abort and start over.
This is why I use rsync. With a little bit of Time Machine still involved for added spice. You know, just to keep things interesting.
Plus, rsync sounds cooler.
Rsync is a command-line tool, available for several platforms, and included with Mac OSX. In its simplest form, it just copies files from one place to another. But it can also remove files no longer needed, exclude things you don’t care about, and work across a network, targeting a mounted volume or a remote server that supports SSH. Which is how I use it.
The end result of an rsync backup is a mirror of your source data. Readable by anything that can read the format of the target filesystem. This part is critical. Backups are irrelevant if nothing can recover them. A bunch of files in a directory on a disk is accessible by just about everything. Time Machine sparsebundles require Time Machine, on a Mac. Files in a directory can be read by any app or OS. Thisincreases your odds of recovery by, well, a lot.
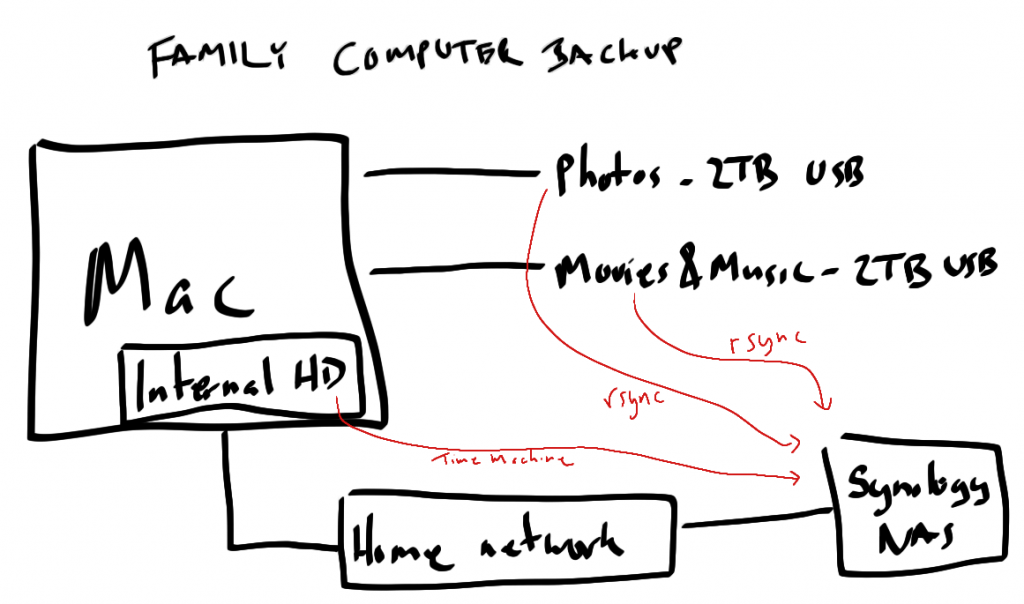
I have a few computers around the house. Our primary family computer is an iMac, and has one internal disk and two USB external disks. The internal disk has all the user folders, documents, applications, and OS files. The external drives contain photos, movies, music, etc.
My backup strategy has the internal disk backed up to my NAS using Time Machine, and the the external disks backed up to the same NAS using rsync.

Some notes:
- The Internal HD volume is less than 100GB, and the backup executes automatically every hour.
- I wrote simple shell scripts to automate the rsync commands. I execute the rsync scripts manually, but these are easy to automate.
I won’t go into too much detail on rsync usage (some resources that might help: 1, 2, 3), but here’s how I backup an entire external volume using rsync:
rsync -av --delete --exclude ".DS_Store" --exclude ".fseventsd" --exclude ".Spotlight-V100" --exclude ".TemporaryItems" --exclude ".Trashes" /Volumes/your-local-volume-name-that-you-want-backed-up/ user-name@backup-server:/volume-name-on-server/path-on-backup-server
The -av says “archive, with verbose output”. The –delete option says “get rid of anything on the server that’s no longer on my local machine” (be careful with this one). The –exclude options allow me to avoid backing up crap I don’t need. The username stuff allows me to log in to the server and perform the backup using that identity on the server.
Summary
Rsync can fail with network or disk hardware errors. Time Machine can fail with network, disk hardware, or buggy software errors. I prefer rsync for the really important stuff, and use Time Machine for the OS disk, which is relatively small and something I can recover from quickly after the inevitable Time Machine error.

