Ben wasn’t really looking forward to this, but I think he enjoyed it after all. Good stuff, Ben!
Laurel Ridge Middle School marching band at the 2011 Portland Rose Festival Junior Parade from Brian Windheim on Vimeo.
Ben wasn’t really looking forward to this, but I think he enjoyed it after all. Good stuff, Ben!
Laurel Ridge Middle School marching band at the 2011 Portland Rose Festival Junior Parade from Brian Windheim on Vimeo.
Ben’s band Audio Rampage performs Seven Nation Army from The White Stripes. Bailey (drums and vocals) simply owns the crowd.
Ben’s band Audio Rampage performs Hate To Say I Told You So from The Hives. Great stuff, guys!
Ben’s band Audio Rampage performs Howlin’ For You from The Black Keys. This recording is for the Small Town Big Talent competition here in Sherwood. Nice work guys!
Ben Windheim and Myron LeRoy were the musical entertainment at the Raindrops to Refuge charity dinner on Friday. A great selection of tunes, and some great guitar work by these two guys.
Ben Windheim and Myron LeRoy at the Raindrops to Refuge charity dinner, February 25 2011 from Brian Windheim on Vimeo.
Ben was playing his guitar in his room yesterday, and I happened by with my iPhone. Grabbed some quick video of him midway through the Smashing Pumpkins Cherub Rock. Rock on, Ben!
I have several acoustic stringed instruments. I’m not very good at playing any of them, but I have a lot of fun trying. Mandolin, ukulele, banjo, and a handful of guitars.
When playing with a drummer or trying to get a recording, it’s nice to be able to plug in an instrument and get some extra volume. Plus, with an electrified instrument you can always add pedals, post-processing, and other effects to alter the sound a bit.
I’ve done a permanent install of an under-saddle pickup on a guitar before, but I didn’t want to spend the time or money on each instrument to get all the instruments upgraded.
I’d heard about homemade piezo-transducer pickups before, so I thought I’d see if I could make one my own. Sure, you can buy cheap ones, but where’s the fun in that?
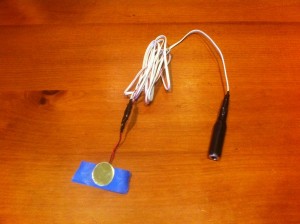
So, I made one myself. Total cost was under $6. Here’s the finished product, in all it’s DIY glory:
Parts list
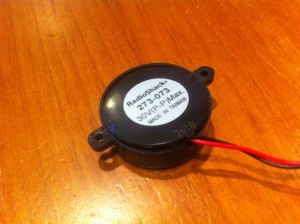
1. Piezo transducer. Radio Shack part number 273-0073.
2. 1/4″ mono jack. Radio Shack part number 274-0340.
3. A length of 2-conductor wire. I used some leftover 18-gauge wire from a garage door opener.
4. Some electrical tape.
5. Some blue painters tape.
Tools aren’t required, but a wire stripper and a solder gun are useful.
Assembly instructions
1. Remove the transducer from the plastic housing. I used a small slotted screwdriver to pry the top off. Be careful, or plan on another trip to Radio Shack and another $3.
2. Strip insulation from both conductors on each end of the wire.
3. Connect the two leads from the transducer to the two conductors on one end of the wire. Insulate bare wires with electrical tape.
3. Disassemble the jack.
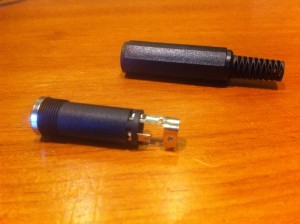
4. Slide the jack housing over the other end of the wire.
5. Connect the conductors on that end of the wire to the two connection points on the jack internals. Solder or tape the conductors in place.
6. Screw the jack housing onto the jack internals.
Connecting the pickup to the instrument
I used blue painters tape to affix the transducer to the top of my mandolin, just below the bridge. Test out several locations on the top and back of the instrument for best sound.
On my ukulele, the best-sounding location was on the back:
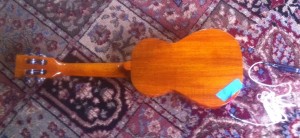
When finished, plug in, grab a beer, and bask in your electrified awesomeness.
If you’re bored, listen to my first electric mandolin recording experiment: Ashokan Farewell, recorded as two A/B inverted parts using my standard recording tools.
Captured a quick recording this evening of Ben playing Fever (Peggy Lee, Little Willie John, and a zillion others). Did this in one take using GarageBand on a Mac with a Line 6 UX-1 interface.
Listen here: Fever.mp3, recorded by Ben Windheim on a Fender acoustic guitar with a Fishman under-saddle pickup.
 Back in 2003 I was coming off a failed startup and worked a couple of contract software development gigs while looking for a steady job.
Oh, and I was building a new house at the time too. I was the general contractor as well as the guy with the hammer in hand. Busy busy.
The first permanent-position offer I got was at Amazon.com, as a senior-level software developer. Can’t recall the exact details of the offer, but it was a pretty good opportunity. I got a new-hire benefits packet in a brown folder along with the offer.
Unfortunately, I lived in Portland, and the job was in Seattle. Building a new house and immediately moving to Seattle seemed a bit rash. I declined the offer, which included AMZN stock in the deal. AMZN has increased over 300% since then.
The job I took instead didn’t require relocation, and didn’t have stock.
I stuffed the benefits folder in a file cabinet and forgot about it.
Fast forward to today, and I have a shiny new Kindle 3 (which is a fantastic device, BTW). Knowing that I’ll be carrying this e-book reader around quite a bit, throwing it in bags & such, I started to get a bit worred about the screen getting damaged.
I’m a DIY kind of guy, so I thought I’d just make a case myself instead of buying one of the lovely manufactured case options out there.
I had just recently emptied out that file cabinet and recyled the folder, and in a moment of serendipity I came up with the idea of using the Amazon.com folder as DIY case material.
Unearthing the folder from the recyle bin took longer than turning it into a case. Three minutes, some scissors, and bunch of packing tape later … behold the most expensive Kindle case ever.

Materials cost: $0.01
Opportunity cost: $lots
I’d provide instructions, but I think you can figure it out yourself.
I’m a firm believer that the best way to get your kid to quit playing guitar as quickly as possible is to get them a crappy instrument. If that’s your goal, hop on over to Costco and get whatever combo pack they have in a box. Get a 12-pack of socks while you’re at it, to make the trip worth it.
Instead, if your goal is to have your child build a lifelong relationship with music — a worthy goal, I think — then you need to get an instrument that doesn’t suck. In fact, it should be at least good.
Of course, you don’t want to risk buying a $3000 Gibson only to find out that little Timmy takes to the guitar like a cat to water.
So, it needs to be cheap. Save up for the Gibson for a few years.
It’s also easy to forget that your young Jack White has tiny hands. That full size guitar that you have had stuffed in your closet since college is about as easy for your kid to handle as a refrigerator.
Cheap, good, and small. The choices narrow.
So, a recommendation. Get this guitar, now:
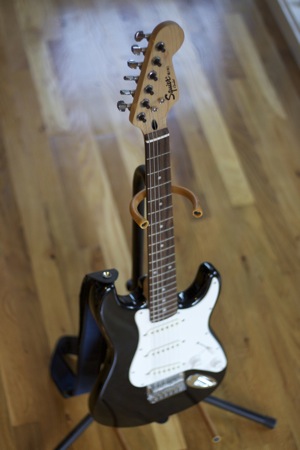
This is a Squier by Fender Mini Strat electric guitar. It’s around $100 everywhere. Musician’s Friend, for example, sells it in two girl-magnet colors.
Not only does it not suck, it’s actually quite fun to play, and sounds good too.
Problem is, it’s still not good enough out of the box. It doesn’t stay in tune at all. An out-of-tune guitar is hard to play, and un-rewarding.
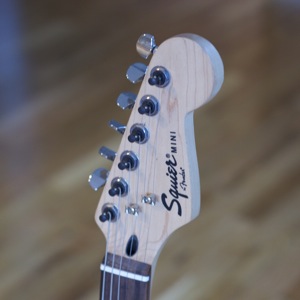
The best thing you can do to improve the playability of this guitar is to put some decent tuning machines on it. Like the Planet Waves Auto Trim tuning machines.
While poor-quality tuning machines abound on most cheap guitars, the overall quality and simplicity of the Squier Mini is, IMO, better than other similarly-priced guitars. And it’s smaller and easier to handle for little hands.
Replacing tuning machines is a simple do-it-yourself project. Outpatient surgery for guitars. Here’s a useful how-to.
For $150 total, you’ve got a very playable instrument that should work well for years.
Cheers!